100 Quilts for Kids Quilt Along // Finishing the Quilt Top
 This is it--the last post in the 100 Quilts Quilt Along series. In case you missed any of the posts, they can be found hereJuly 15: Quilt Along Introduction + GiveawayJuly 19: Materials + Cutting InstructionsJuly 26: Foundation Piecing the BlocksAugust 9: Assembling the Quilt TopAugust 16: Quilting TipsAugust 23: Quilting Tips from a Pro: Guest Post by Angela WaltersToday: Finishing the quilt
![100 Quilts for Kids Quilt Along! [+ giveaway]](http://farm9.staticflickr.com/8291/7579630758_4a4dd7caa6_m.jpg) Today, I'm going to talk a little bit about finishing your quilted quilt! [In case you got stuck at the basting stage, check out this basting tutorials by Rita at Red Pepper Quilts ! Baste your quilt, quilt it, and come back. Ready, go.] I have included a few tips, defined some terms, and included links to a few binding tutorials.
Today, I'm going to talk a little bit about finishing your quilted quilt! [In case you got stuck at the basting stage, check out this basting tutorials by Rita at Red Pepper Quilts ! Baste your quilt, quilt it, and come back. Ready, go.] I have included a few tips, defined some terms, and included links to a few binding tutorials.
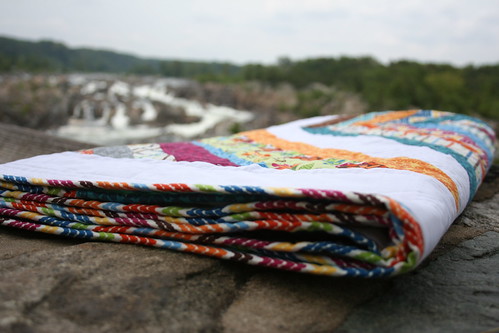
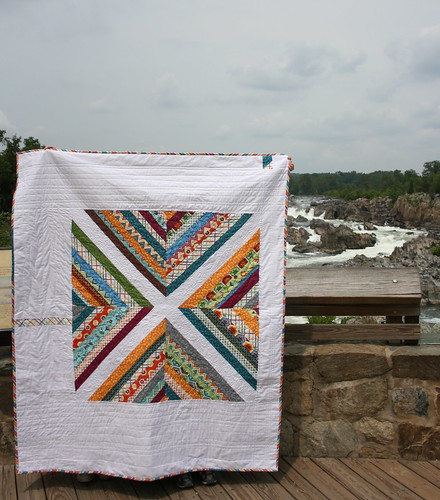
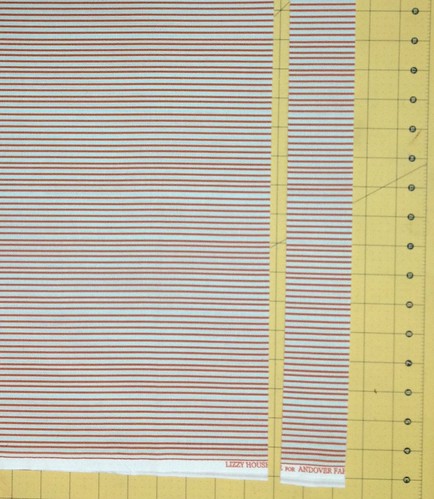
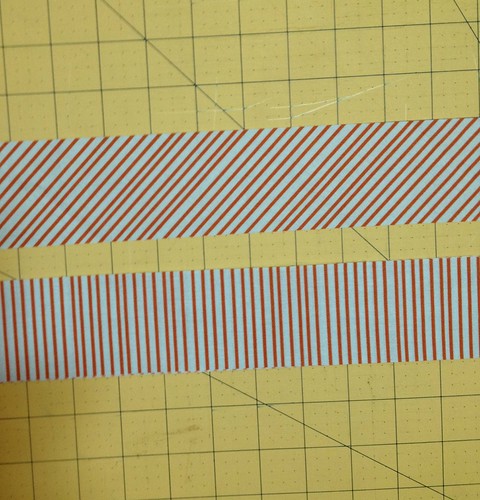
Trim Your Quilt TopBefore you can add binding to your quilt, you need to square it up and trim it down. I don't know that there is a fool-proof method to trimming your quilt top--it gets easier with practice, especially with big quilts.I place a large square ruler in the top right corner, line it up so that the corner is "square" (to the best of my ability), and use a rotary cutter to trim off the excess. (I often use seam lines as a guide.) Sometimes when you quilt, you pull the corners a bit--do the best you can.Next, I place the ruler in the bottom right corner and trim. Then, I place a 24'' x 5'' ruler along the right side, in between the two squared off corners, and trim, sliding the ruler if the quilt is big. I repeat these steps for the left corners, then square off the left side, top, and bottom. If you don't have a large square ruler, you can eyeball it and use a regular ruler--the square one just makes it a bit easier.Straight Grain Binding: Fabric has three grainlines (grain = direction of the thread). There is a great definition of grainline at Coletterie. The first is the lengthwise grain--it runs lengthwise along the whole bolt of fabric.The second is the weft, or cross-wise grain, which runs selvage to selvage. I use straight-grain binding, meaning that I cut the binding strips along the cross-wise grain grain, from selvage to selvage. This is similar to how you would cut strips for any quilting project.
Bias Binding:Bias binding is cut, you guessed it--along the bias, which is the third grainline. It runs in a 45 degree angle. Bias binding jazzes up striped bindings, but it's value is more than cosmetic. Bias binding has a lot of stretch in it, and works well with curves. Conventional wisdom also says that bias binding is stronger and will hold up better in the long run. If you choose to use bias binding, I recommend this Continuous Bias Binding Tutorial by Art Gallery Fabrics.
Making Binding Strips:Next, decide whether you want to use binding strips that are 2.5'' or 2.25''. I like the look of 2.25'', but I think i am in the minority.To determine how many strips you need, add each of the sides of the quilt together and add 12''. If your quilt is 36'' x 40'', you will need 36'' + 40'' + 36'' + 40" + 15'' or 167'' of binding. If you cut using straight grain binding from a half yard of fabric (width ~42''), you will need 4 strips.

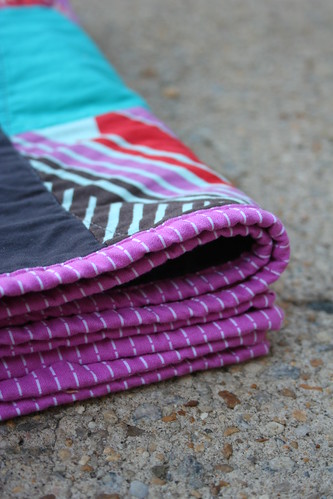
Machine Binding vs. Finishing by HandI think binding your quilt partially by hand or all by machine is a personal preference. If you practice enough, and are careful, I'm convinced that machine binding can look just as professional as hand binding. Practice, of course, is key!I wrote a Machine Binding Tutorial last year that shows how to sew together strips and attach them to your quilt. There are several different ways to bind by machine--I suggest checking out a variety of tutorials and choosing what works best for you. [This picture shows what the stitching on the front of the quilt looks like after washing]
Finally, here are the binding tutorials I have bookmarked over the past few years--everyone does things a little bit differently; hopefully one of the methods will work for you!Binding Tutorial by Amanda Jean of Crazy Mom QuiltsFast Machine Quilt Binding 101 by Amy from Diary of a QuilterMachine Binding by Rita of Red Pepper QuiltsMachine Binding Tutorial by Nettie of A Quilt Is NicePat Sloan's Machine Binding Tutorial (blanket stitch)Single Fold Binding by Kerry of Very Kerry BerryZig Zag Binding by Rachel from Stitched in ColorFor binding by hand, I'm partial to Heather Bailey's tutorial.CelebrateHave fun finishing your quilt! Leave me a comment or send me an email if you have any questions! Don't forget the linky party for any 100 Quilts for Kids quilt, including a Quilt Along Quilt, September 20.