
Star Wars Galaxy Quilt // Tutorial in 3 Sizes

Today's post is a tutorial for the Star Wars Galaxy Quilt. It is available in 3 sizes--Queen, large throw, and baby/toddler sizes. If you aren't a huge Star Wars fan, no worries. This could easily be made with any combination of fabrics, especially fabrics that you want to feature and use in the stars.By changing the colors, you can change the entire look of the quilt!
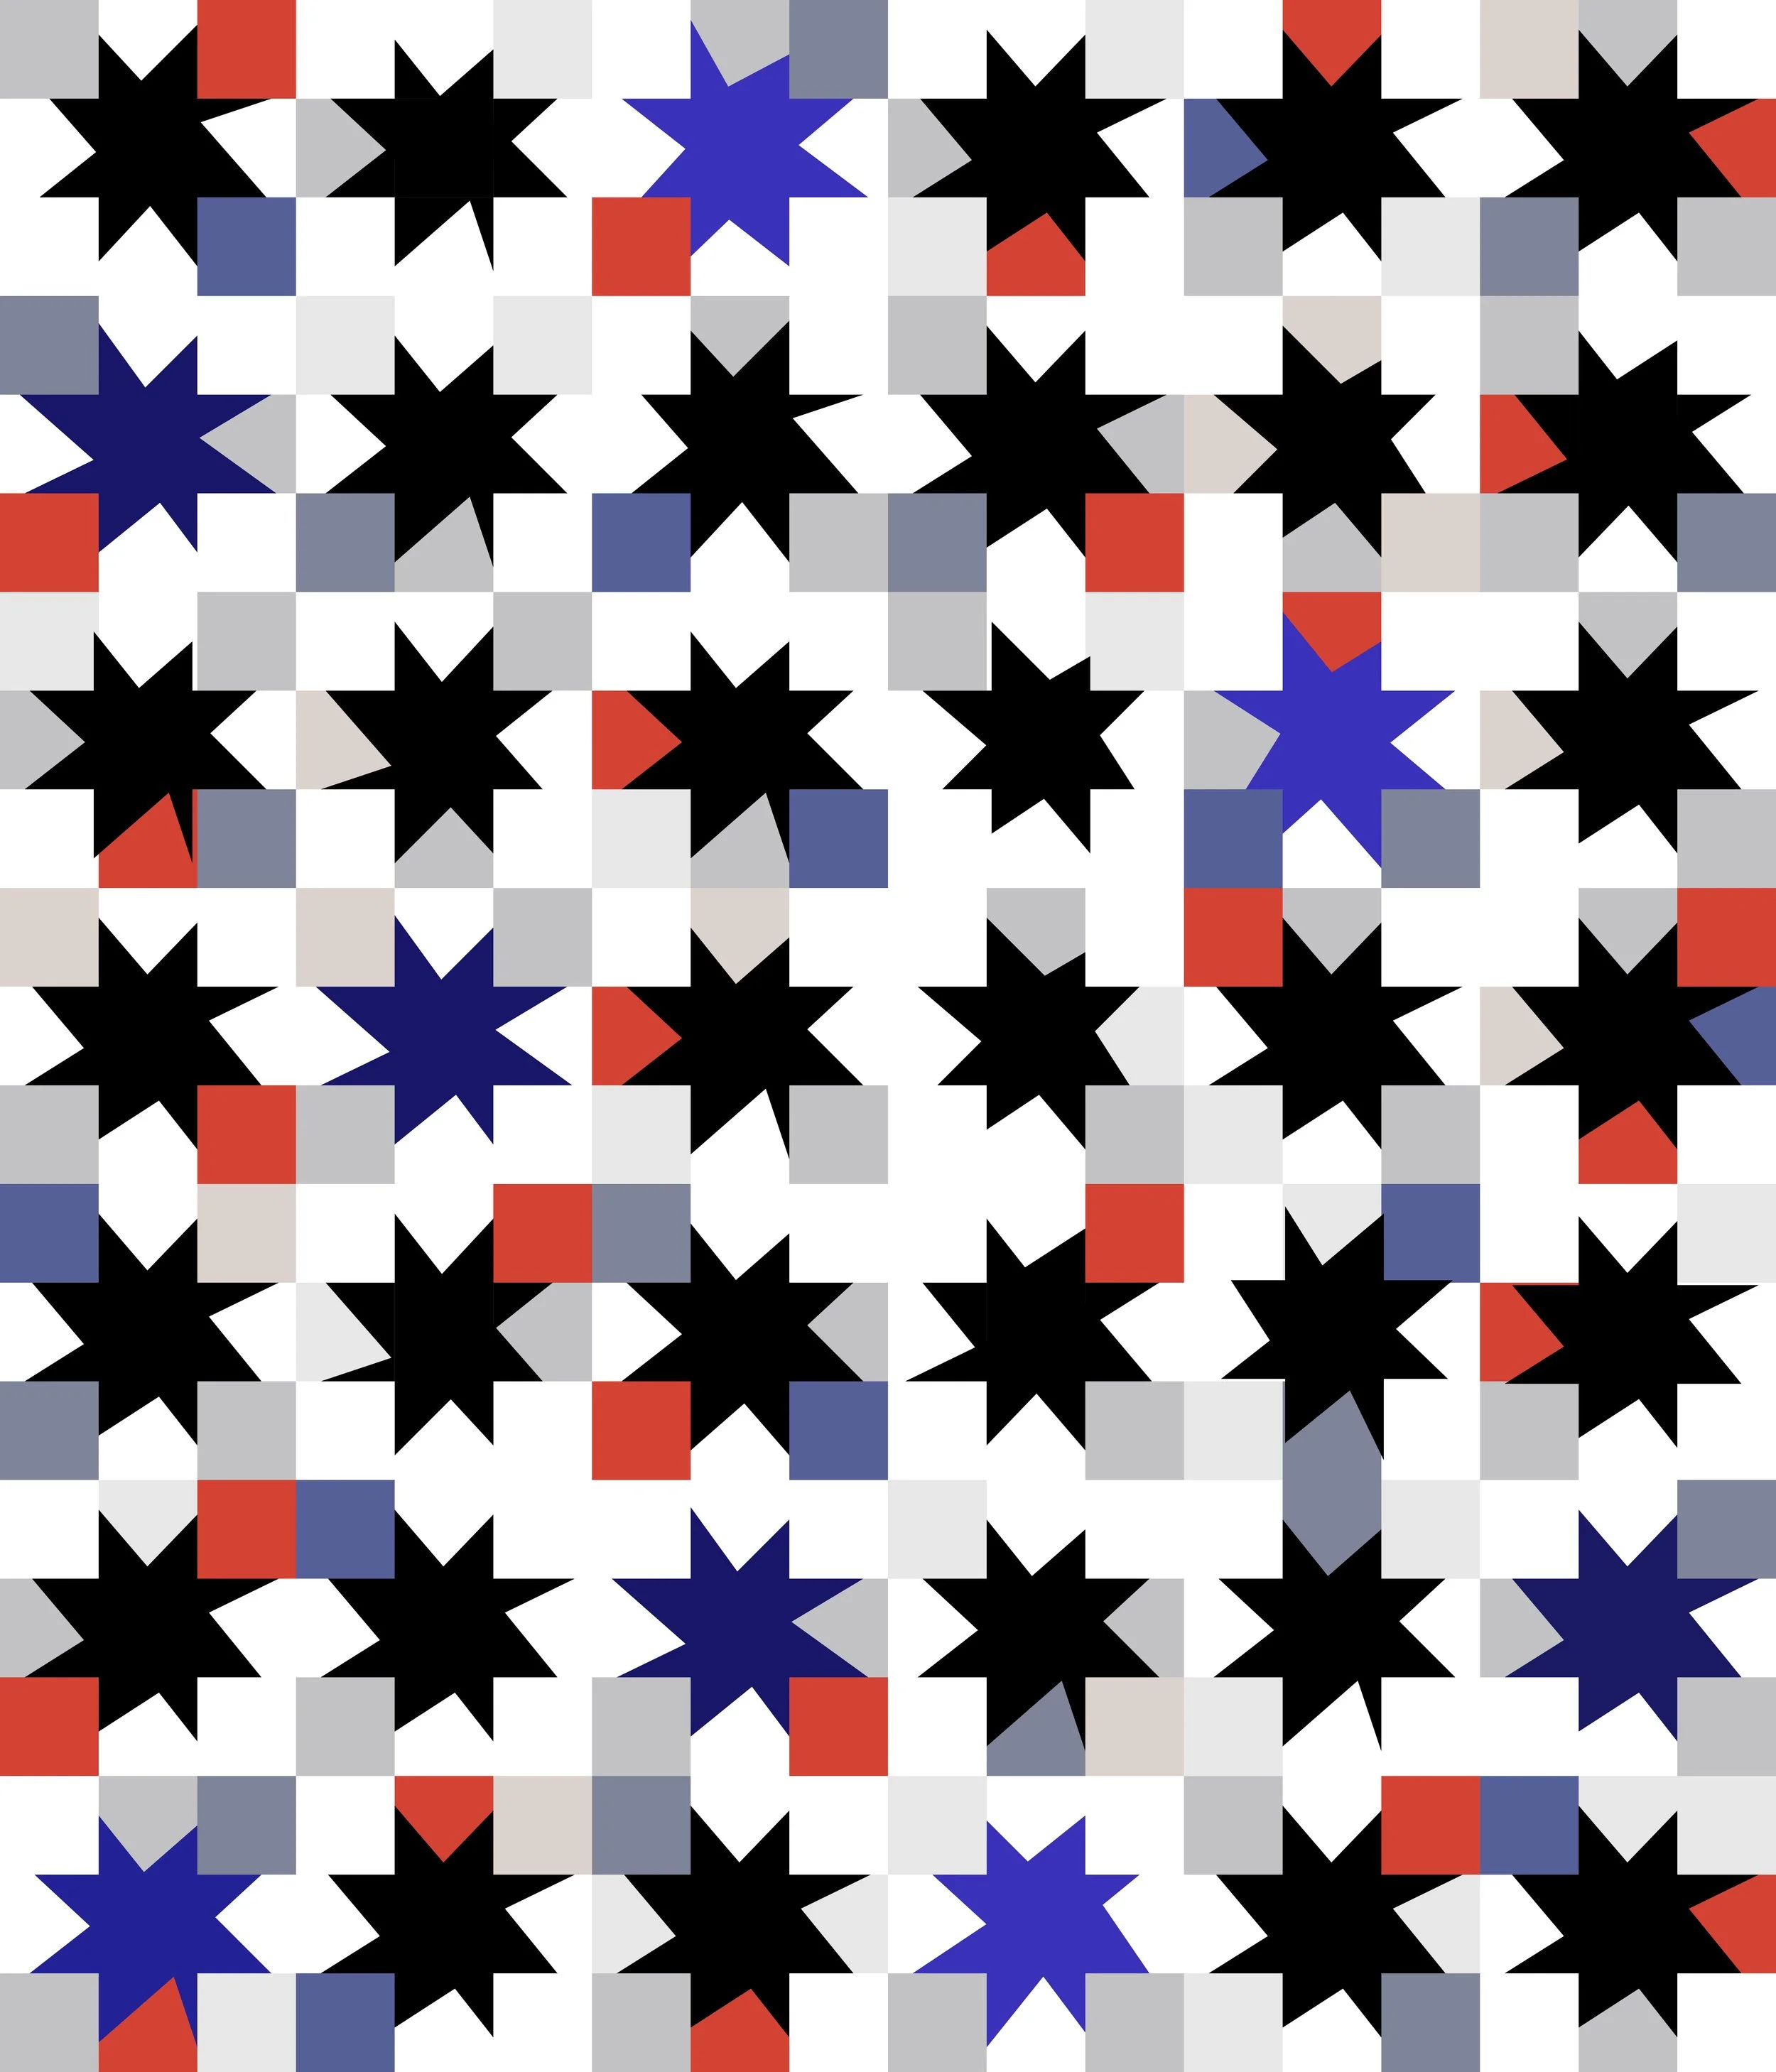
Queen Size Quilt Stats 81’’ x 95’’ 42 Stars that finish at 14’’ each
Large Throw Size Quilt Stat 81’’x 81’’ 12 Stars that finish at 14’’each
Baby/Small Throw Quilt Stats 42’’ x 56’’ 12 Stars that finish at 14’’

I love this quilt mocked up in happy colors

Star Wars Galaxy Throw Size—include large pieces of fabric with 2 rows of stars for a unique look
Star Wars Galaxy Quilt
Baby Quilt— 42’’ x 56’’—12 Stars that finish at 14’’

Star Wars Galaxy Baby Quilt Size
Below is a quilt that I made for my sonl

StarWarsGalaxyQuilt_Tutorial
The quilt tutorial has 3 options--queen, large throw, and baby/small throw size. Really, you could mix and match and add and subtract rows until the quilt is any size you want.
Star Wars Galaxy Quilt // A Quilt Tutorial in 3 Sizes

WonkyStarTutorial_StarWarsQuilt
Note: This quilt is made up almost entirely of wonky stars. If you need a refresher, I have a tutorial here.
The basic construction is the same: this quilt is made up of multiple wonky star blocks.
Each star uses (5) 5’’ dark squares and (8) 5’’ light squares, or (13) squares total
I used Star Wars licensed fabric and a combination of black, navy, and light colored/low volume blocks.
Queen Size Quilt Instructions
81’’ x 95’’—42 Stars that finish at 14’’
Fabric Requirements
Each star uses (5) 5’’ dark squares and (8) 5’’ light squares, or (13) squares total
For this quilt, you will need: 210 Dark Squares + 336 Light Squares = 546 Total Squares
Black Fabric 2 1/2 yards feature fabric4 FQs (different prints)
Navy Fabric 1/2 yard feature fabric(2) different print FQs
Light Colored and Low Volume Fabric(5) light colored feature prints, 3/4 yard each(5) low volume 1/2 yards OR (10-12) low volume FQs
*if you are making a Star Wars quilt, I counted any feature fabrics that were not black or navy as “light colored”, including the red, darker gray, blue, etc. If you use different fabrics than I did, the grays, reds, blues, etc. might be too dark to include as background fabric.
Batting At least 89’’ x 103’’
Backing 5 1/2 yards backing (if you are using a directional print, or are having your quilt professionally long armed, you may need a different amount)
Binding 5/8 yard binding
Cutting Instructions
Black Fabric
Cut a total of 170 Black squares
Cut (10) 5’’ squares out of each of the 4 black fat quarters; 40 total squares
Cut (130) 5’’ square out of the 2 1/2 yards of the black feature print
Navy Fabric
Cut a total of 40 Navy squaresCut (20) 5’’ squares out of the 1/2 yard of the navy feature print
Cut (10) 5’’ squares out of each of the 2 navy fat quarters; 20 total squares
Light Feature Fabric
Cut a total of 200 Light Feature Fabric Squares
Cut (40) 5’’ squares out of each of the five 3/4 yard pieces of the light feature fabric.
Cut Low Volume Fabric
116 Light SquaresCut (24) 5’’ squares out of each of the five half yard pieces, OR (12) 5’’ out of each of the 10-12 low volume FQs. You will have a few squares leftover, either way.
Quilt Construction
Star Wars Galaxy Quilt
Step 1: Choose fabric combinations for 30 stars. You will need 5 dark squares and 8 light squares for each star. Mix up the light/low volume prints, and use the same dark print for each of the 5 squares.Note: You may want to mix and match dark fabrics for a few of the stars.
Step 2: Sew the 30 wonky star blocks. See this tutorial if you need directions.
Step 3: Arrange the stars on a design wall (or design floor). The quilt should measure 6 stars across and 7 stars down.
Step 4: Choose fabrics for the remaining stars, one at a time. Add them to your design wall/floor, paying attention to how the design works together. Once you are satisfied, sew the wonky block. Repeat with all remaining blocks. Alternately, you can follow the graphic included below.
Step 5: Rearrange the stars if needed, until you are happy with the arrangement. Sew the blocks together in horizontal rows. Press each row well. Press odd numbered rows (1, 3, 5, and 7) to the left, and even numbered rows (2, 4, 6) to the right.
Finishing the Quilt
Step 1: Baste the quilt. I always use pins; lots of people spray baste. Faith Jones of Fresh Lemons Quilts has a pin basting tutorial here.
Step 2: Quilt the quilt—I used straight lines and also outlined the stars on one quilt, and stippled/free motion quilted another. This quilt lends itself to a variety of quilting styles. I have a Pinterest board with different quilting examples here.
Step 3: Trim the quilted quilt.
Step 4: Bind the quilt according to your favorite method. I have a machine binding tutorial here, if you are interested.
Large Throw Size Quilt Instructions
Star Wars Galaxy Throw Size
81’’x 81’’12 Stars that finish at 14’—’9 Black Stars—3 Navy Stars
Fabric Requirements
Each star uses (5) 5’’ dark squares and (8) 5’’ light squares, or (13) squares totalFor this quilt, you will need: 60 Dark Squares + 96 Light Squares = 156 Total Squares
Black Fabric 3 1/2 yards (if you want to piece the section to the left of the stars) OR 4 1/2 yards(3) different print FQs
Navy Fabric (3) different print FQs
Light Colored and Low Volume Fabric (8) FQs, mix of light colored feature print and low volume fabric*if you are making a Star Wars quilt, I counted any feature fabrics that were not black or navy as “light colored”, including the red, darker gray, blue, etc. If you use different fabrics than I did, the grays, reds, blues, etc. might be too dark to include as background fabric.
Batting At least 89’’ x 89’’
Backing 4 1/2 yards backing (if you are using a directional print, or are having your quilt professionally long armed, you may need a different amount)
Binding5/8 yard binding
Cutting Instructions
Black Fabric
Cut (1) piece that is 2 1/4 yards by width of fabric (this will go to the right of the stars). Trim the selvage edges.
Cut (1) piece that is 15’’ x 81’’ (2 1/4 yards, this will go to the left of the stars)***if you would rather piece this section, then cut (3) pieces that are 14’’ x 27.5’’
***Cut a total of 45 Black squaresCut (10) 5’’ squares out of each of the 3 black fat quarters for a total of 30
Cut (15) 5’’ square out of the remaining black Star Wars feature print
Navy Fabric
Cut a total of 15 Navy squares
Cut (5) 5’’ squares out each of the (3) navy FQs
Light Feature Fabric
Cut a total of 96 Light Feature/Low Volume Fabric squares
Cut (40) 5’’ squares out of each of the five 3/4 yard pieces of the light feature fabric.
Cut Low Volume Fabric
Cut of a total of 96 Light Feature/Low Volume Squares
Cut (12) 5’’ squares out of each of the 8 light Star Wars/Low Volume FQs
Quilt Construction

Star Wars Galaxy Throw Size_Crop
Step 1: Choose fabric combinations for 9 stars. You will need 5 dark squares and 8 light squares for each star. Mix up the light/low volume prints, and use the same dark print for each of the 5 squares.Note: You may want to mix and match dark fabrics for a few of the stars.
Step 2: Sew the 9 wonky star blocks. See this tutorial if you need directions.
Step 3: Arrange the stars on a design wall (or design floor). The quilt should measure 2 stars across and 6 stars down.
Step 4: Choose fabrics for the remaining 3 stars, one at a time. Add them to your design wall/floor, paying attention to how the design works together. Once you are satisfied, sew the wonky block. Repeat with all remaining blocks. Alternately, you can follow the graphic included below.
Step 5: Rearrange the stars if needed, until you are happy with the arrangement. Sew the blocks together in vertical rows. Press each row well. Press the first row towards the top of the star, press the second row towards the bottom of the star. Sew the rows together.
Step 6: If you are piecing the portion of the quilt to the left of the stars, do that now. If not, skip to step 7. Sew the 3 pieces that are 14’’ x 27.5’' vertically together, press seams. This will measure 81.5''; cut .5'' off of the top to make it 81''.
Step 7: Sew the 15’’ x 81’’ (or 14'' x 81'' pieced strip) to the left of the pieced stars. Press.
Step 8: Sew the other large piece (2.25 yards by width of fabric) to the right of the quilt. Press.
Finishing the Quilt
Step 1: Baste the quilt. I always use pins; lots of people spray baste. Faith Jones of Fresh Lemons Quilts has a pin basting tutorial here.
Step 2: Quilt the quilt—I used straight lines and also outlined the stars on one quilt, and stippled/free motion quilted another. This quilt lends itself to a variety of quilting styles. I have a Pinterest board with different quilting examples here.
Step 3: Trim the quilted quilt.
Step 4: Bind the quilt according to your favorite method. I have a machine binding tutorial here, if you are interested.
Baby/Small Throw Size Quilt Instructions
Fabric Requirements
Each star uses (5) 5’’ dark squares and (8) 5’’ light squares, or (13) squares total
For this quilt, you will need:
60 Dark Squares + 96 Light Squares = 156 Total Squares
Black Fabric 1/2 yard black feature print(2) different print FQs
Navy Fabric (3) different print FQs
Light Colored and Low Volume Fabric (8) FQs, mix of light colored feature print and low volume fabric*if you are making a Star Wars quilt, I counted any feature fabrics that were not black or navy as “light colored”, including the red, darker gray, blue, etc. If you use different fabrics than I did, the grays, reds, blues, etc. might be too dark to include as background fabric.
BattingAt least 50'' x 64''
Backing2 yards backing (if you are using a directional print, or are having your quilt professionally long armed, you may need a different amount)
Binding1/2 yard binding
Cutting Instructions
Black Fabric
Cut a total of 45 Black squares
Cut (10) 5’’ squares out of each of the 2 black fat quarters for a total of 20
Cut (25) 5’’ square out of the 1/2 yard of black Star Wars feature print.
Navy Fabric
Cut a total of 15 Navy squares
Cut (5) 5’’ squares out each of the (3) navy FQs
Light Feature Fabric
Cut a total of 96 Light Feature/Low Volume Fabric squares
Cut (40) 5’’ squares out of each of the five 3/4 yard pieces of the light feature fabric.
Cut Low Volume Fabric
Cut of a total of 96 Light Feature/Low Volume Squares
Cut (12) 5’’ squares out of each of the 8 light Star Wars/Low Volume FQs
Quilt Construction
Star Wars Galaxy Baby Quilt Size
Step 1: Choose fabric combinations for 9 stars. You will need 5 dark squares and 8 light squares for each star. Mix up the light/low volume prints, and use the same dark print for each of the 5 squares.Note: You may want to mix and match dark fabrics for a few of the stars.
Step 2: Sew the 9 wonky star blocks. See this tutorial if you need directions.
Step 3: Arrange the stars on a design wall (or design floor). The quilt should measure 3 stars across and 4 stars down.
Step 4: Choose fabrics for the remaining 3 stars, one at a time. Add them to your design wall/floor, paying attention to how the design works together. Once you are satisfied, sew the wonky block. Repeat with all remaining blocks. Alternately, you can follow the graphic included below.
Step 5: Rearrange the stars if needed, until you are happy with the arrangement. Sew the blocks together in horizontal rows. Press each row well. Press odd numbered rows (1, 3) to the left, and even numbered rows (2) to the right.
Finishing the Quilt
Step 1: Baste the quilt. I always use pins; lots of people spray baste. Faith Jones of Fresh Lemons Quilts has a pin basting tutorial here.
Step 2: Quilt the quilt—I used straight lines and also outlined the stars on one quilt, and stippled/free motion quilted another. This quilt lends itself to a variety of quilting styles. I have a Pinterest board with different quilting examples here.
Step 3: Trim the quilted quilt.Step 4: Bind the quilt according to your favorite method. I have a machine binding tutorial here, if you are interested.