
Half Rectangle Triangle Quilt Tutorial

I’m so excited to share this Half Rectangle Triangle (HRT) Quilt Tutorial with you, as part of my Half Rectangle Triangles series. Be sure to check out the other posts!

Original Half Rectangle Triangles: Tips, Tricks + Tutorials Post
Half Rectangle Triangles: Does the Angle Make a Difference?
Paper Piecing Half Rectangle Triangles
Favorite HRT Ruler: The Bloc-Loc Ruler in Large –it’s pricey [you get 2 rulers] and makes trimming HRTs a dream

Whimsey + Structure: Piecing the Half Rectangle Triangle Quilt
This quilt is a lot of fun to piece. It encompasses structure, i.e. the HRT units are precision pieced, and whimsey– you are able to let go of all of the rules for color and fabric placement and block orientation (as long as the HRT units are vertical). Randomness within structure can bring delightful results.
I used mostly solids for this quilt, which is the easiest course if you haven’t sewn a lot of HRTs before. Unlike half square triangles (HSTs) with half rectangle triangles, if you are using patterned fabrics and cut from top right to bottom left, the resulting triangles will be different than if you cut from top left to the bottom right. If you happen to cut the wrong way, and are using solids, you can simply flip the fabric over and around and it works just fine.

Fabric Requirements
Quilt as Shown measures 36-1/2” x 42-1/2”
I used (9) quarter yard solid cuts, and (2) quarter yard patterned cuts
Note: there will be some left overs that you can use for the back. You could easily use additional quarter yard cuts if you wanted more variety in the quilt.
You can cut approximately 10 rectangles from each quarter yard of fabric. If you choose to use fat quarters, you can cut (10) 4” x 8” rectangles assuming the fat quarter is a true 18” x 22” cut.
Fabrics used:
Kona Solids: Acid Lime, Ultra Marine, Everglade, Jungle, Peapod, Kale, Pomegranate, Valentine, and Purple
Me and You Batiks: Lines in Turquoise and Gold
Alison Glass: Observatory, Spangled in Sulphur
A Note On Making Bigger or Smaller Quilts Using This Method aka This Quilt is Totally Customizable
In order to make a larger quilt, simply increase the number of cut rectangles and sewn triangles. This quilt measures 12 units across by 7 units down. By doubling that: 24 units across by 14 units down, the quilt will measure approximately 72” x 84” (336 rectangles). Change the size of the starting rectangles, or quadruple the number of HRT pairs for a large throw size quilt. Happy quilting!
Cutting the Half Rectangle Triangles
All of the triangles for this quilt are 1:2 ratio triangles, which seems to be an industry standard. All of the triangles for this quilt started as 4” x 8” rectangles and are trimmed to 3-1/2” x 6-1/2” after being sewn. If you want to start with another size rectangle, you can use my Half Rectangle Triangle Cutting Chart here.
1. Cut (84) 4” x 8” rectangles.
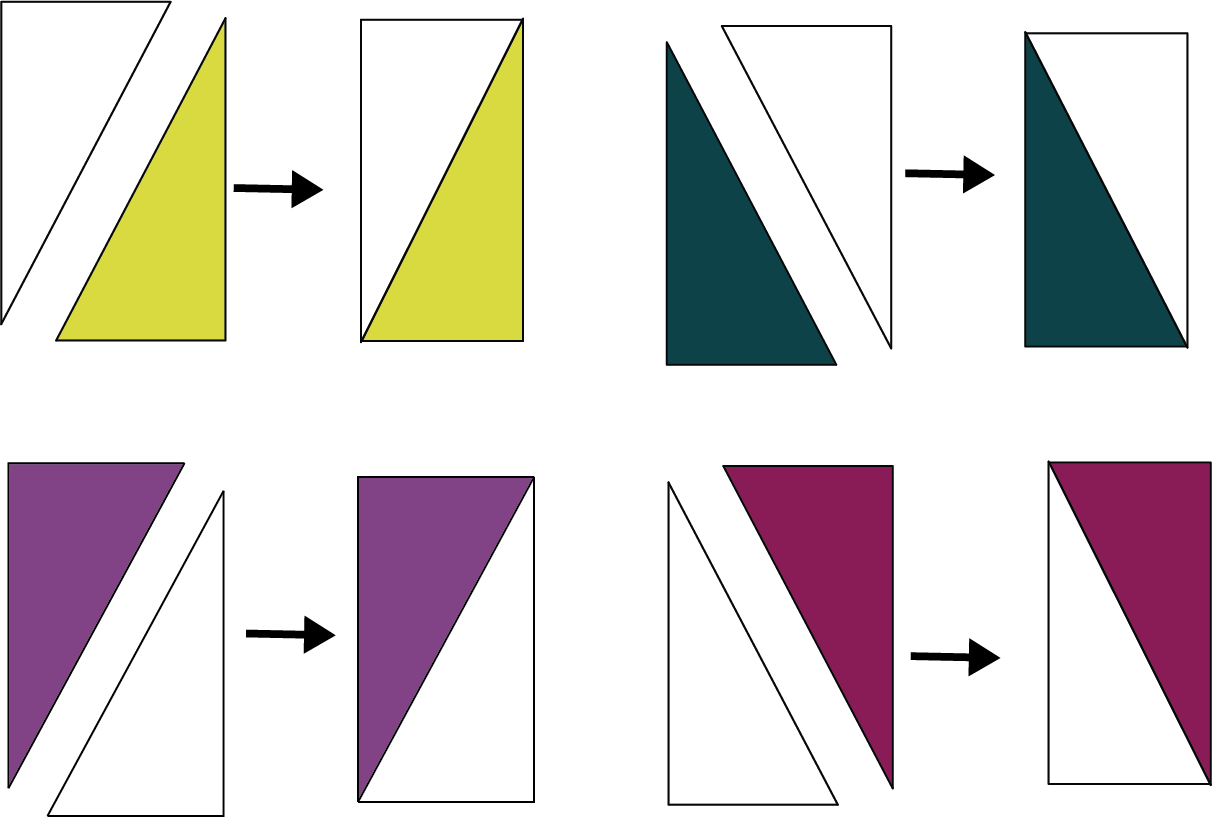
2. Select (42) 4’’ x 8” rectangles. Cut each in half diagonally from top left corner to bottom right corner. If you are not using solids, just make a note that the cutting direction matters!
3. Select the remaining (42) 4’’ x 8”rectangles. Cut each in half diagonally from top right corner to bottom left corner.
Note: I mixed up the rectangles randomly before dividing them in half, so, for example, not all of the 4” x 8” Acid Lime rectangles were cut from top left to bottom right.

1. Mix up the Half Rectangle Triangles, and arrange them randomly into four piles.
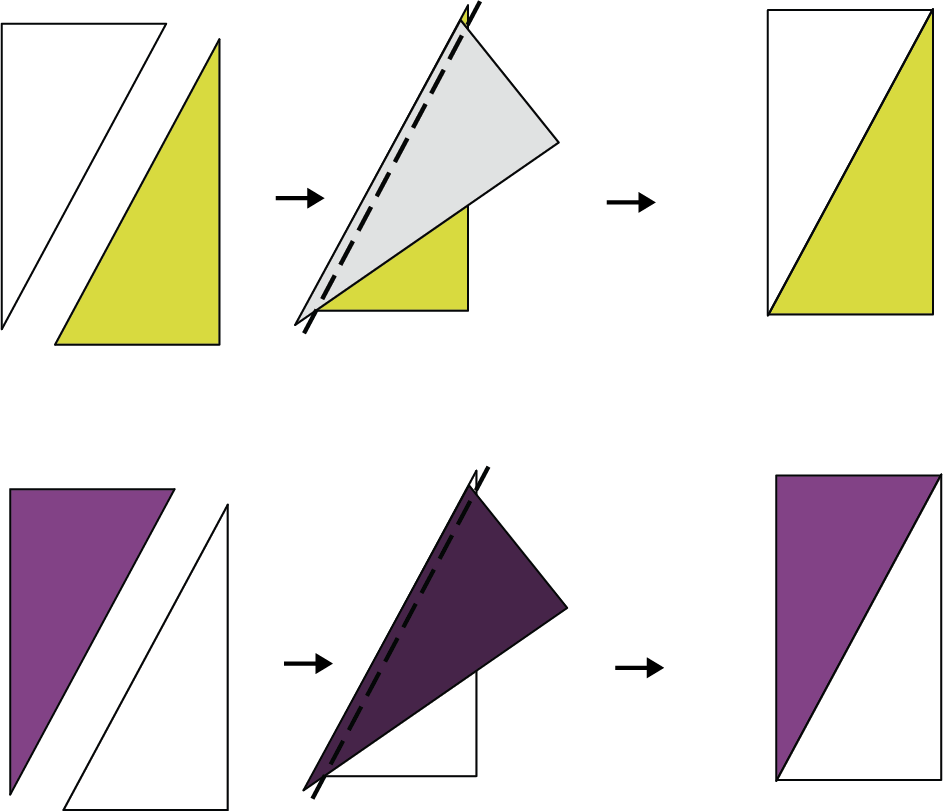
2. Choose (2) triangles that were cut from the top left to bottom right (the two piles on the left above). Place the (2) triangles right sides together, make sure to offset by 1/4’’ on both ends (both ends of your triangles will have slight dog ears). Your 1/4” seam stitching will begin in the “V” of the fabric created by the dog ear, as shown in the diagram below.

3. Stitch down the long end of the triangle. Press seams toward the darker fabric.
4. Repeat this process for a total of 42 HRT pairs oriented in the same direction.
5. Repeat this process for the HRTs that were cut from the top right corner to the bottom left corner.
6. Repeat the process until you have pieced 84 pairs of half rectangle triangles–it isn’t essential that you have 42 of each orientation, but 84 total.
Square Up the Half Rectangle Triangles
Note: If you want to square these up the easiest way, buy the The Bloc-Loc Ruler in Large. Both ways work, you just have to pay attention a bit more without the ruler.
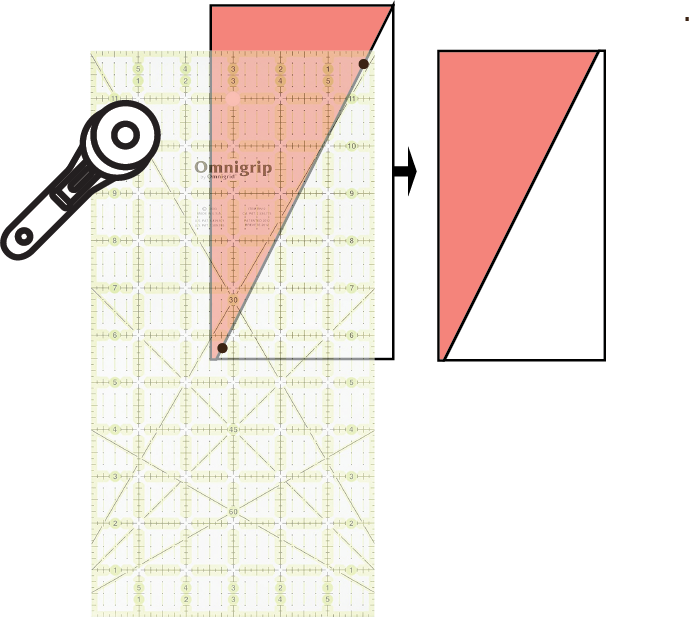
1. Select (1) HRT sewn unit [start with a unit that was cut in half diagonally from top right corner to bottom left.]
2. Line up your ruler so that the 1/4’’ x 1/4’’ intersection resides in the seam line. On some rulers, there is a dot or a crosshatch to make this easier.
3. Trim the long edge first–make sure not to angle the HRT unit, but keep it straight (right angles aligned to the ruler marks on your mat). Then trim the top.
Note: Notice that you do not trim from corner to corner, as you would when making a half square triangle.

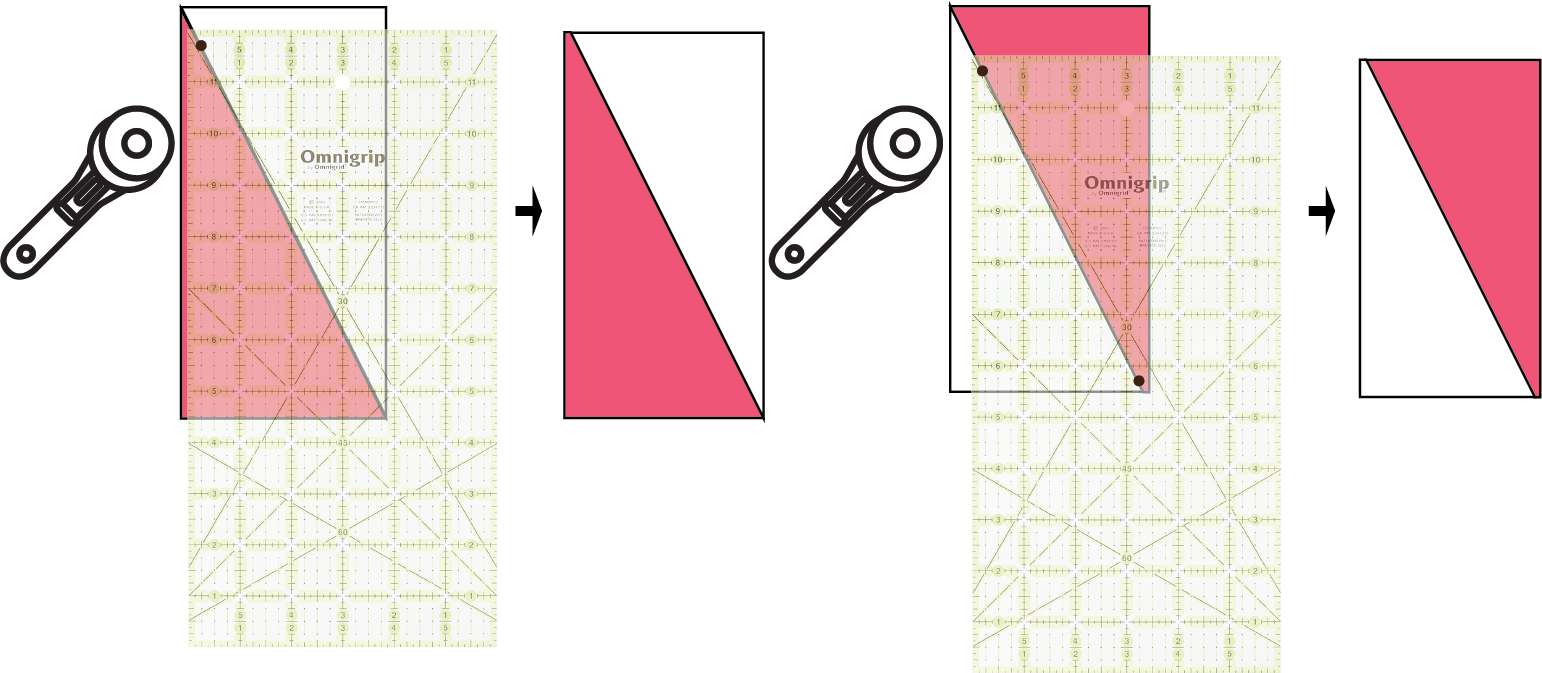
4. Rotate the HRT unit as shown in the second diagram. Determine how large you need to trim the HRT units. You can refer to the Half Rectangle Triangle Cutting Chart if needed. This unit is trimmed to 3-1/2’’ x 6-1/2’’.
5. Line up your ruler in preparation for trimming to the correct size as shown; in this example, this is a large HRT unit, so trim to 3-1/2’’ x 6-1/2’’. Ensure that the 1/4’’ x 1/4’’ intersection lies in the seam line as before, and trim to size. Notice that the trimmed units are not trimmed from corner to corner, but are offset.
6. The same method is used to trim HRT units cut in half diagonally from top left corner to bottom right.
A Note on Trimming HRTs
You might be tempted to trim your HRT units from corner to corner, as you would a Half Square Triangle unit. Resist the temptation!
If you trim HRT units from corner to corner, instead of offset trimming (as explained on page 5), your seam allowances will be off. In order to keep your points, you will have to increase your seam allowance to somewhere between 3/8’’ to 1/2’’ when you sew vertical rows of HRT units (at least 1:2 ratio HRT units) together.

Piece the Quilt Top Together
There are several ways to organize and lay out the quilt top. I put each of the HRT pairs in a large pile, not paying attention to orientation or color. I transferred them to a design wall randomly in a 12 across, 7 down grid. After that, I made a few small tweaks and called it good.

You could be more intentional in this process, or more random.
Once you have a 12 x 7 layout that you like, sew each row together.

Press seams to the left on odd rows (1, 3, 5, and 7) and to the right on the even rows (2, 4, and 6) so that the seams nest.
Sew the rows together. Press seams. Voila! This quilt top measures 36-1/2” x 42-1/2”. Baste, quilt, and bind according to your favorite methods.

If you make a quilt using this tutorial, please let me know. Tag me @swimbikequilt on Instagram or send me an email.