
Free Quilt Block Tutorial // Evening Star // Summer Sampler Turns 10
Free Evening Star Block Tutorial by Katie Blakesley swimbikequilt.com
Welcome to to the tenth block for the Summer Sampler Turns 10 Quilt Along. If you are following along on Instagram, please tag us @swimbikequilt @lee.a.heinrich @freshlemonsquilts and use our hashtag #summersamplerturns10.
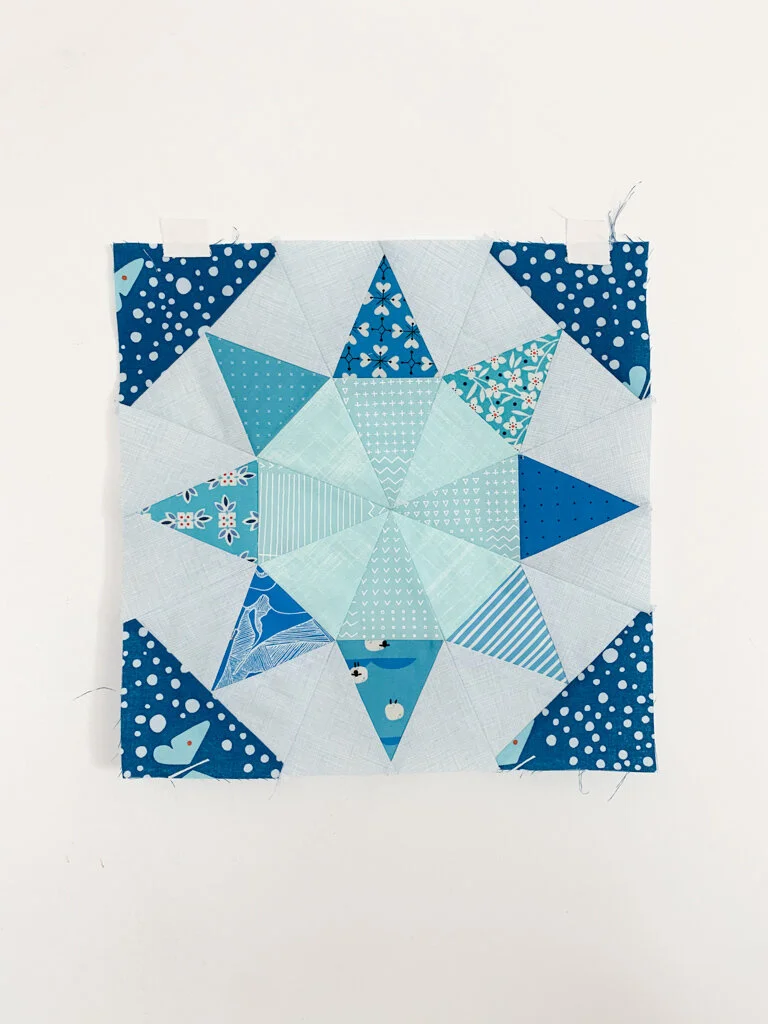
This week’s free block tutorial is the Evening Star Quilt Block.
This tutorial for the Evening Star block was originally posted in 2011, as part of the Summer Sampler Series—a collection of 12 free block tutorials provided by Faith Jones, Lee Heinrich, and I. Each year, we host a block of the week Summer Sampler Series, which you can find here.
Evening Star Tutorial

Note: There are lots of different ways to color this block—I have included five different options in the above graphic. The Evening Star block looks just as good using a variety of scrappy prints in similar colors [like my 2021 block] , scrappy prints in a variety of colors [like my 2011 block] as it does using 2 or more solids, like the blocks above.
Before You Start
Print four copies of each of the paper piecing templates, Template A and Template B.
Make sure to print the templates at 100%, and double check that the 1 inch ruler on the printed template actually measures 1 inch.
The two templates are almost identical, with the additional of a corner triangle (5A) for Template A. Note: the order in which you piece the two templates is slightly different.
Shorten your stitch to make the paper easier to tear away at the end—I shorten mine to 1.4 but it may vary based on individual machines.
Tip: Write the fabric colors on the templates to make piecing easier
Future Quilt Ideas: This would be such a fun quilt to make, you can color it in so many different ways. I put together 2 coloring pages—one with six individual blocks and one for a larger Evening Star quilt.

Cutting Instructions
Variety of Medium Blue Prints—A1, B1:
(8) 4’’ x 4’’ squares
Variety of Light Blue Background Prints—A3, A4, B2, B3:
(16) 4’’ x 4’’ squares
Variety of Light Blue Center Prints—A2, B4:
(8) 4’’ x 4’’ squares
Darker Blue Prints—A5:
(2) 5’’ x 5’’ squares, cut in half along the diagonal to create (4) triangles
Piece the Evening Star Templates

Note: This is Template A—your template will be marked 1A, 2A, etc.
Start with Template A. Place the Medium Blue 4’’ x 4’’ square (1A) on the back [unprinted side] of the template. Make sure that it covers the entire 1A spot. The right side of the fabric should be facing out, with the wrong side of the fabric against the back of the template.
Place the Light Blue 4’’ x 4’’ square (2A) on the back [unprinted] side of the template, right sides together with fabric square 1A. Make sure that it does not cover the space for Template 2A, but is oriented as shown.

3. Sew on the line between 1A and 2A, make sure to stitch into the seam allowance. [Make sure you have shortened your stitch length before starting].


4. Trim your seam allowance to 1/4’’, open your seam, and press to the side.
5. Place the Light Blue 4’’ x 4’’ square (3A) on the back [unprinted] side of the template, right sides together with fabric square 1A. Make sure that it does not cover the space for Template 3A.

This shows the seam line stitched, and helps to show the fabric placement for 3A.


This photo shows the stitching into the seam allowance.
6. Stitch along the line between 1A and 3A.


7. Trim your seam allowance to 1/4’’, open your seam, and press to the side.
8. Place the Light Blue 4’’ x 4’’ square (4A) on the back [unprinted] side of the template, right sides together with fabric square 1A. Make sure that it does not cover the space for Template 4A.


9. Stitch along the line between 4A and 1A.
10. Trim your seam allowance to 1/4’’, open your seam, and press to the side.


11. Place a Dark Blue Triangle (5A) on the back [unprinted] side of the template, right sides together with the other fabric. Make sure that it does not cover the space for Template 5A.
12. Stitch along the line.
13. Trim your seam allowance to 1/4’’, open your seam, and press to the side.


14. Repeat with the remaining (3) Template A units.
15. Piece (4) Template B Units, using the same steps as detailed for Template A.

This is Template B
Assemble the Quilt Block
16. At this point, I like to remove the paper from my pieced templates. If you do, make sure to return your stitch length back to the original length. [You can also remove the paper after you have finished piecing the block].
17. Lay out the the quilt block as shown below.

18. Take (1) Template A unit and (1) Template B unit. Match the points as shown below—pin through the seam where the triangle points meet up. I stick a pin straight through the point at the top of the triangle through both layers of fabric, and then pin. This will help you to sew more precisely just above the top of the triangles.


19. Sew the two units together. Press the seams. Continue until you have sewn all (8) units into (4) quarters. Press the seams.

20. Pin two quarters together, sew, and press. Repeat with the remaining two sewn quarters.
Tip: You will want to make sure to pin both where the medium blue triangles meet, and also where the center triangles [in this case the light blue triangles], as well. The photo below shows me folding back one of the quarters to make sure that the seam allowances are aligned.

21. Match points, pin and sew the two halves together. Press. Voila!

Where to find products from the video:
Daylight Wafer 2 Lightbox-- the Daylight Company also sells the cutting mats
Creative Grids Ruler for Trimming: 3-1/2'' x 12-1/2'' Ruler OR 3-1/2'' x 6-1/2''
My FAVORITE 12-1/2'' x 12-1/2'' ruler
This is the Evening Star Block that I made in 2011—a totally different look, and also great! Also, if you look closely, there are small bits of paper in the center star—make sure to remove all the paper, folks!

